lyticOS
Introduction
lyticOS provides a powerful and intuitive user interface for controlling Elementar IRMS systems from Setup & Acquisition through to Data Processing, Reporting and beyond.
lyticOS has been designed from the ground up to work uniquely with our isoprime visION / precisION Mass Spectrometer and inlet systems.
lyticOS can be thought of as 3 key components:
lyticOS Home Screen
The lyticOS home screen is the entry point of lyticOS, once lyticOS has finished loading (the lyticOS Splash Screen is no longer displayed) and the user has successfully logged in (if logging in feature is enabled).
From here, the user can:
- Customize their system configurations and device settings.
- Search for samples
- Create batches
- Import batches (from other lyticOS installations or third-party software)
- Change global lyticOS settings
- Run utilities to export data and export logs
- Manage licenses
- View information about the current version of lyticOS
- Log out
The lyticOS home screen also serves as the entry point to connect to a system or open a batch file.
Connected System Window
The Connected System Window allows the user to interact with the system and connected devices.
The System Status Summary pane quickly reports the status of the system allowing the user to drill down to view device-specific warnings and errors.
Central to the Connected System Window is the Task List, which is used to run individual tasks, with appropriate methods.
Method parameters can be edited within the task list via columns (if exposed by the method) or directly within the Manage Methods dialog. The list of parameters displayed in the Manage Methods dialog is a convenient abstraction away from the powerful and flexible Method Workflow Designer, which is fundamental to all methods.
During acquisitions, the real-time data is shown within the Data View panel and real time data processing means that detected peaks are highlighted and results reported within the Data Analysis panel.
Batch Processing WindowThe Batch Processing Window allows the user to perform batch processing operations on their samples, while being either Online or Offline. lyticOS provides a complete solution to creating fully calibrated reports without the need for any additional processing outside of lyticOS.
A batch can be one of several inlet specific types, which allows the user to perform data processing tailored for that inlet.
Central to the Batch Processing Window is the Batch Grid, which displays all the same information as the Connected System Window Task List as well as comprehensive results and calculations all the way up to fully calibrated results. The grid is fully customizable and acts as a report designer (the columns that are visible define what is included in the report).
lyticOS supports Blank Subtraction, Drift Correction as well as Multi-Point Multi-Isotopic calibration. All corrections can be applied via a streamlined Wizard and/or through advanced correction assignments and options.
Batch processing is performed in real-time, meaning that as soon as the batch is opened / created the processing is performed in the background. Should any settings be subsequently changed, then the results will automatically be updated, taking full advantage of the power of modern day computing resources.
Logging In
lyticOS can be configured to support multiple users. If so, when starting lyticOS you will be presented with the lyticOS Login dialog.

lyticOS Login dialog
You are then able to select the user that you want to login as and input the password.
See Managing User Permissions and Resetting Admin Password.Home Screen
The Home Screen is the main entry point of lyticOS and is always present while lyticOS is running.
lyticOS Home Screen
Automatic Updates
The software automatically checks for updates periodically. If an update is available then this will be shown in the top of the lyticOS Home screen as a hyperlink.
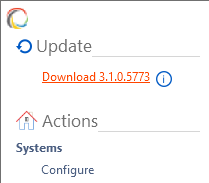
lyticOS Automatic Update available
Clicking the “info” button will take you to a web page with extra information about the update.
Menu
The left-hand navigation menu provides the following functionality:
Systems
Menu options applicable to systems.
Configure
Manage the systems (collection of devices) and the individual device settings within each system.
See Configuring Systems.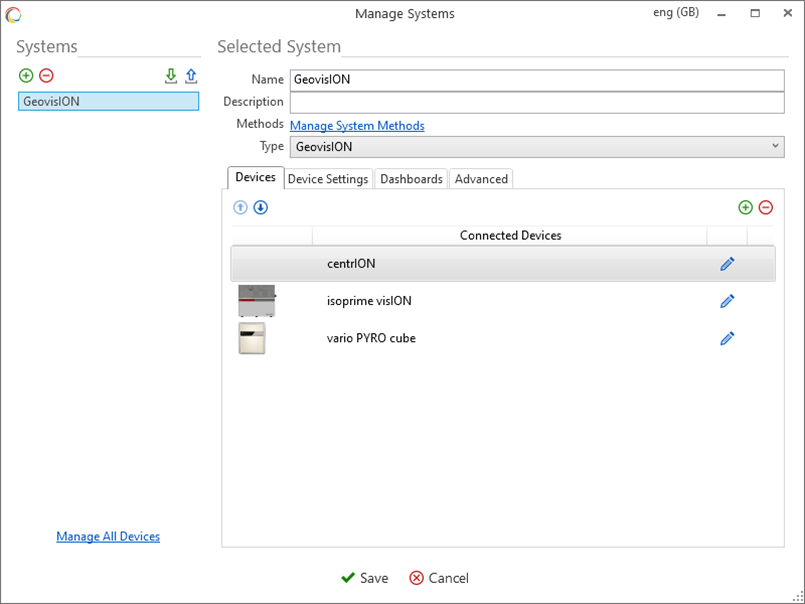
Batches
Menu options applicable to batches.
Search
Provides advanced search functionality to search remote and local directories for samples. Search by sample type, name, description, date, etc.
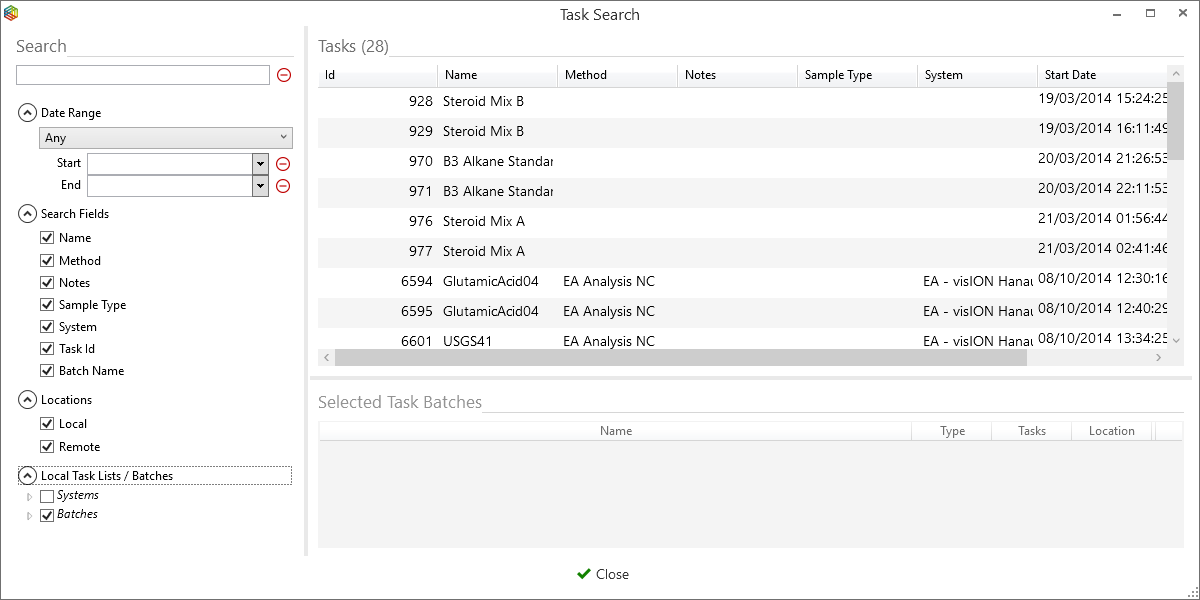
lyticOS Search
Create
Starts the Batch Creation wizard to create inlet specific batch types.
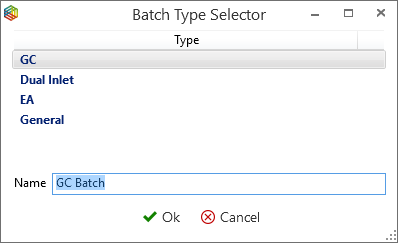
lyticOS Batch Type Selector
Import
Starts the Import wizard to import data from other lyticOS installations (*.iarc), IonVantage (lyticOS Import license required) or Third-Party (lyticOS Import license required) data files.
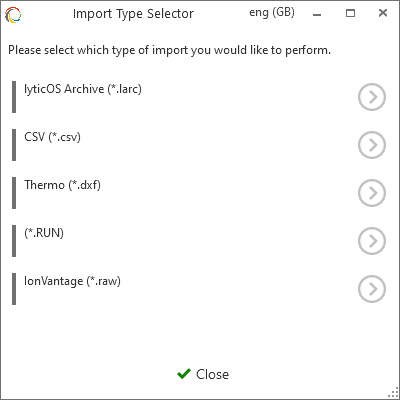
lyticOS Import Type Selector
lyticOS
Menu options application to lyticOS.
Settings
Manage global (System or Batch independent) lyticOS settings such as default processing parameters. Manage user logins.
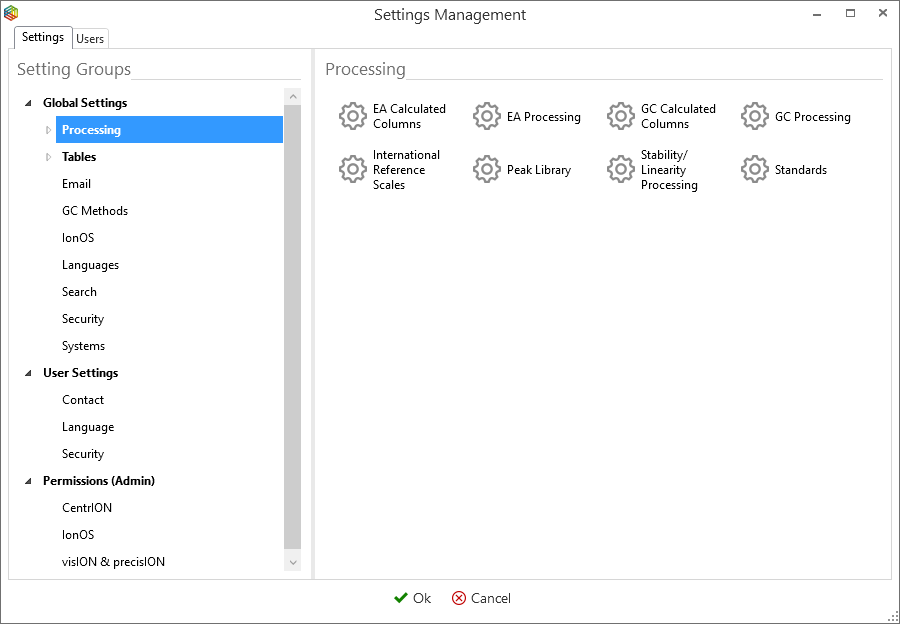
lyticOS Settings Management Dialog
Utilities
Export and Delete data. Export Logs. Customize Language
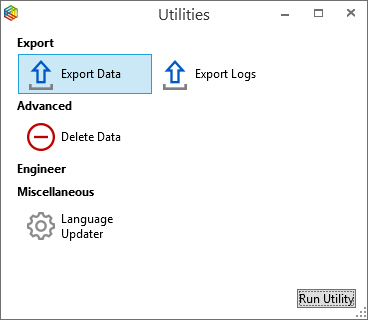
lyticOS Utilities Dialog
Licenses
Add and Remove lyticOS License Files. Activate Licenses. View Software License Agreements.
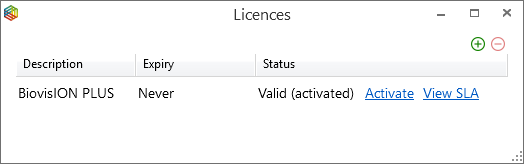
lyticOS Manage Licenses Dialog
Help / About
View the current version of lyticOS and links to documentation and check for the most recent updates.
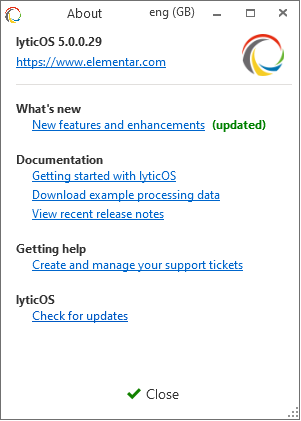
lyticOS About Dialog
The Help / About dialog provides many links to useful resources that are updated regularly.
You can manually check for updates by clicking the "Check for updates" link.
See Getting Help and Checking for Updates.
Log Out
Log out of lyticOS as the current user.
See Managing User Permissions.Systems
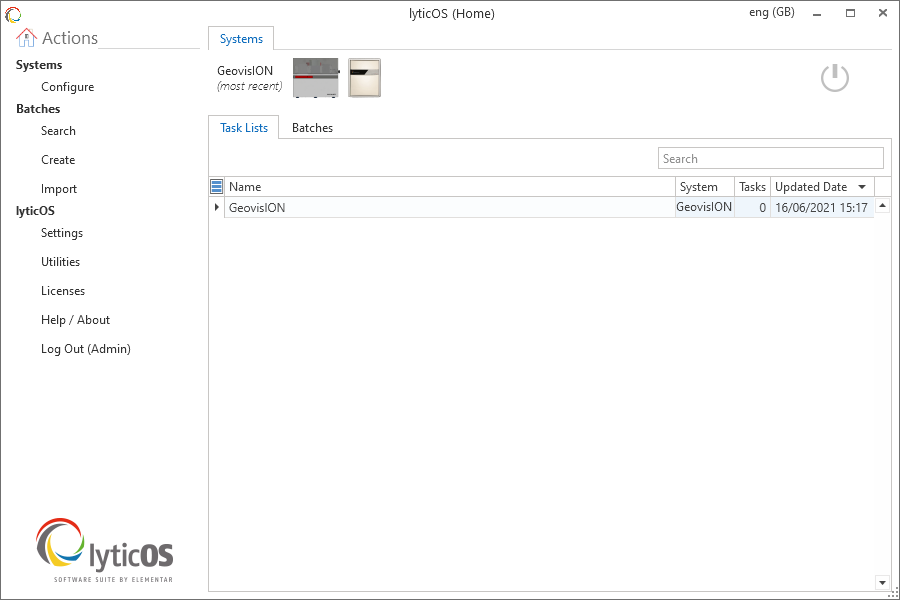
The Systems area shows the currently configured systems.

lyticOS currently configured systems
Images corresponding to the devices configured for the system are displayed for clarity.
A System Configuration File (*.isys) is provided by Elementar with any instruments that are supplied with lyticOS. The file can be found on the accompanying USB memory stick. This system file will have been imported by the engineer that installed the system. See Importing Systems.
What is a System?
A system is a collection of devices and their settings as well as system specific settings.
A system is also a logical grouping of Task Lists (Task List). Task Lists are created while connected to a system (note: task lists can be imported from excel etc.
Tasks can be organized and processed outside of a System or Task list, by adding them to Batches. A task can be added to a batch automatically at run time (Batch column) or retrospectively after the task has been run. A task can be added to multiple batches and any processing applied within a batch will be distinct from any other batches that the task is contained in.
It is possible that multiple systems may share the same device instances (e.g. connected to the same device on the same communication port) and therefore share the same device level settings. In this case, some parameters may be editable at the system level. E.g. An Autosampler may operate with a different tray configuration when used as part of a different system. This allows the device to be reused in different modes for different systems, but fundamentally shares the same core settings. See System Device Mappings.
lyticOS informs the user of the most recently used system by displaying the text “(most recent)” next to the system name. This is useful, when there are multiple systems configured.
You can quickly access the system configuration of a system by Right Clicking on it and clicking Manage.
Once connected to the system, the user can take full advantage of the flexible task list to schedule and run samples. Features include (license dependent), Customizable Methods, Customizable Method Workflows, Flexible Task List, Real Time Acquisitions, Real Time Data Processing, System Status Summary, System Status, Custom Dashboards and Interactive Custom Schematics.
Connecting to a SystemYou can connect to a system by clicking the Connect button next to the corresponding system.
lyticOS can only connect to a single system at a time.
lyticOS will then display the Connected System Screen.
See Connected System Screen.Batches
All existing batches are displayed in the batches area of the lyticOS Home Screen.
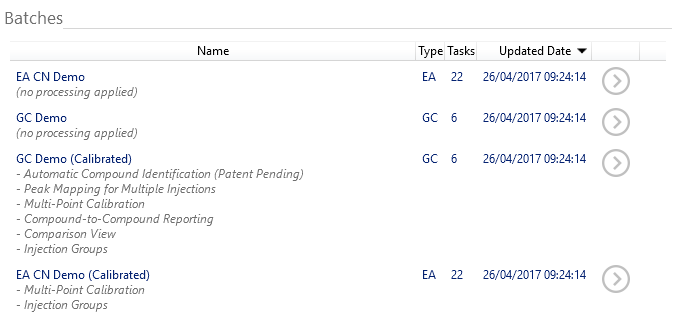
lyticOS Home Screen - existing batches
The batch name, description, type, number of tasks (samples) and the most recently updated date are clearly visible within the Batches area of the lyticOS Home Screen.
A batch is a collection of samples and parameters defining how the batch should be processed. A batch is associated with a specific inlet type, to make the data processing as straightforward as possible. A sample can be within several batches and processed independently.
To open a batch, click the Open button or Double Click on the batch and a Batch Processing Window will open. It is possible to open several batches at the same time.
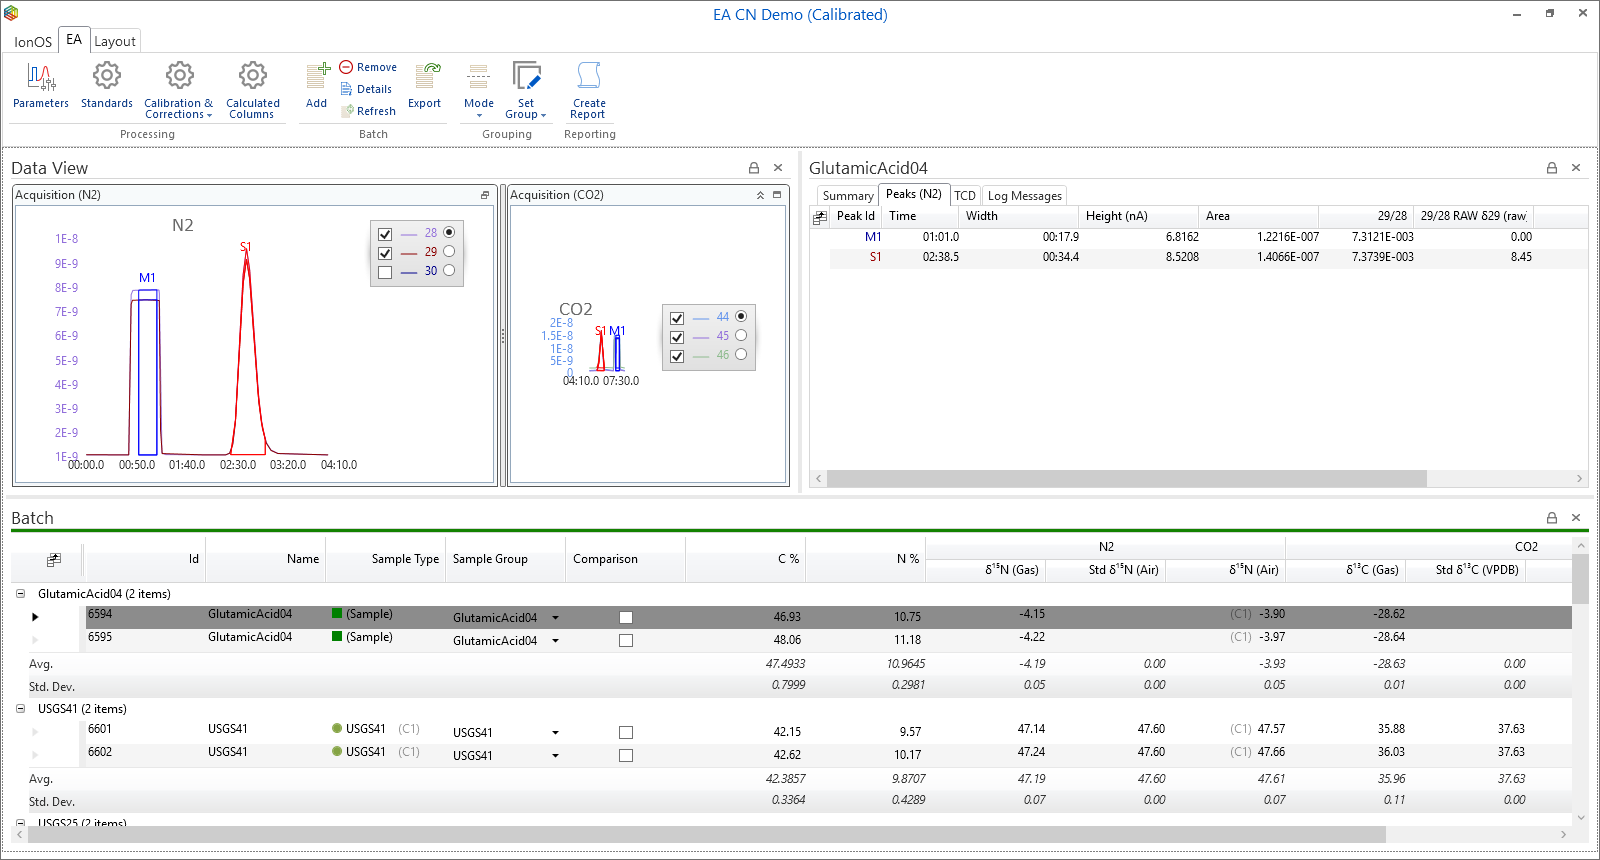
lyticOS - Example Batch
The Batch Processing Window will display (by default) the Batch Grid, Batch Data View and the Batch Data Analysis panels.
Right clicking on a batch within the Batches area of the lyticOS Home Screen displays the option to remove it.
See Creating Batches, Importing Data, Exporting Data, Deleting Data, Batch Processing, Calibration, etc.
System Configuration
A system is a collection of devices and their settings as well as system specific settings.
Systems can be configured by clicking lyticOS Home -> Systems -> Configure. The Manage Systems dialog will then be shown.
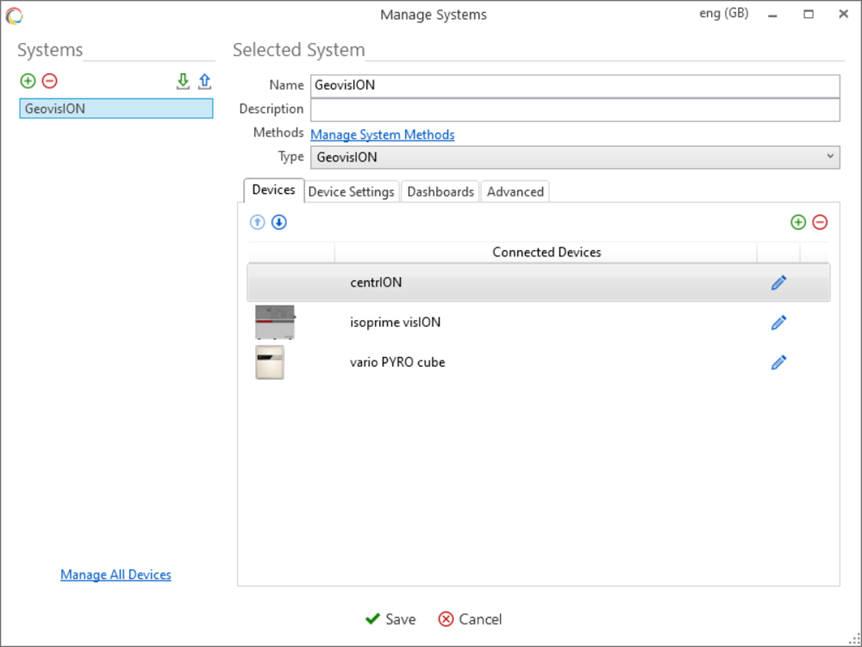
lyticOS Configure Systems
The Manage Systems dialog displays the currently configured systems and the devices that are being used by them.
Select a system to see details about the system.
The name and description of a system are customizable.
You can add, remove, import or export system configurations by clicking the relevant buttons.
The Manage System Methods button will show the Manage Methods dialog, which will show only the methods supported by the current system configuration.
The Devices can be reordered by selecting a device and clicking the Move Up or Move Down button. This means that the devices will appear within the Connected System Window – System Devices Status Panel in the defined order.
Individual device settings can be edited by clicking the Edit Device button next to a device. This will display the Manage All Devices dialog, with the relevant Device Instance already selected
You can Add a device by clicking the Add Device button.
You can Remove a device by selecting it and clicking the Remove Device button. If you remove a device from a system and it is not referenced by any other system (see System Device Mappings), then it will still exist within lyticOS. To remove the device completely, see Manage All Devices.
Import / Export Configurations
System configurations (*.isys) can be imported and exported using the buttons in the top left corner of the configure systems dialog. An exported configuration is saved to a file (*.isys). The configuration file contains all the settings for each device within that system, including settings that are only applicable when connected to the system. The layouts for the system are also exported. If you have purchased an instrument bundle, you will have received a USB package which contains your specific system configuration file.
System Device Mappings
For more information about system devices and sharing a device between multiple systems see System Device Mappings.
Adding a Device
To add a device to a system, first select the system that you want to add the device to and click the Add Device button.
Some devices can only be added to a system once, so if the device already exists within the system it will not be selectable from the Device Type Selection dialog.
Select the Device Type that you want to add to the system and click OK.
If there is already a device instance configured within lyticOS of that type (see Manage All Devices), lyticOS will display the Device Instance Selection dialog. You can either select an existing device (which may be used by another system – see System Devices Mappings) or you can click the Create New button to create a new Device Instance.
In effect, when adding a device to a system, you are either
- Adding a reference to an existing Device Instance (Select Existing).
Or
- Adding a new Device Instance and adding a reference to it (Create New)
You can also add devices (without assigning them to a system), see Manage All Devices.
Manage All Devices
You can manage all the devices currently configured, by clicking the Manage All Devices button within the Manage Systems dialog.
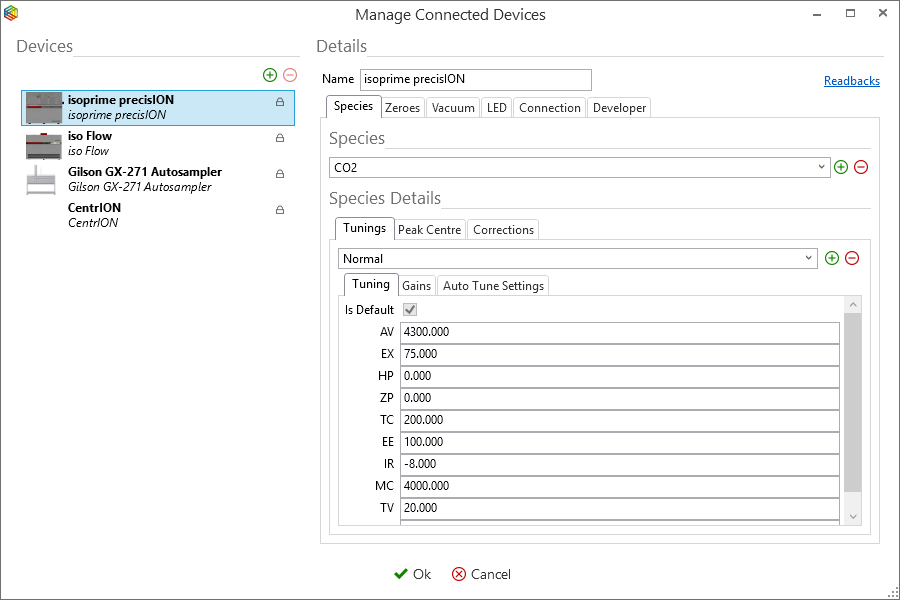
Manage All Devices dialog
A Device Instance is represented by an Image (optional), its name (unique) and its type (in italic print below its name). A lock icon indicates that the device is used by one or more Systems, so it cannot be removed. The absence of a lock icon, indicates that the Device Instance is not referenced by any Systems and can be removed.
Once a Device Instance is selected within the Manage All Devices dialog, you will be able to see / edit its details. All devices have a name that is customizable and should be unique. Care should be taken to ensure that you are editing the correct device settings (if there is more than once device configured of a type).
If lyticOS is currently connected to a system, then its settings will not be editable. To edit the settings, close the Manage All Devices dialog and the Manage Systems dialog and disconnect from the connected system.
For information about editing specific device settings see Editing Device Settings.
You can remove a Device Instance by selecting it and clicking the Remove Device Instance button.
You can add a new Device Instance by clicking the Add Device Instance button. In this case, the device will then have to be manually added to a System within the Manage Systems dialog (See Adding a Device).
Editing Device Settings
From the lyticOS Home Screen, select Systems -> Configure to display the Manage Systems dialog.
From the Manage Systems dialog select the system that contains the device whose settings you want to edit. Select the Edit Device Settings button next to the device.
You can also click the Manage All Devices button to show the Manage All Devices dialog and select the appropriate device whose settings you want to edit.
TODO – Guides on editing specific device settings. Appendix?Connected System Window
To connect to a system, click the Connect to System button next to the system within the lyticOS Home Screen. The Connected System Window will then be shown.
Introduction
The layout of the Connected System Window can be split up into 3 areas.
- A Ribbon Menu at the top of the connected system page that shows contextual content
- The System Status Summary pane that shows the status of the system
- A region below the Ribbon Menu contains all other content such as the Task List, Data View, Data Analysis, System Messages and System Status panels.
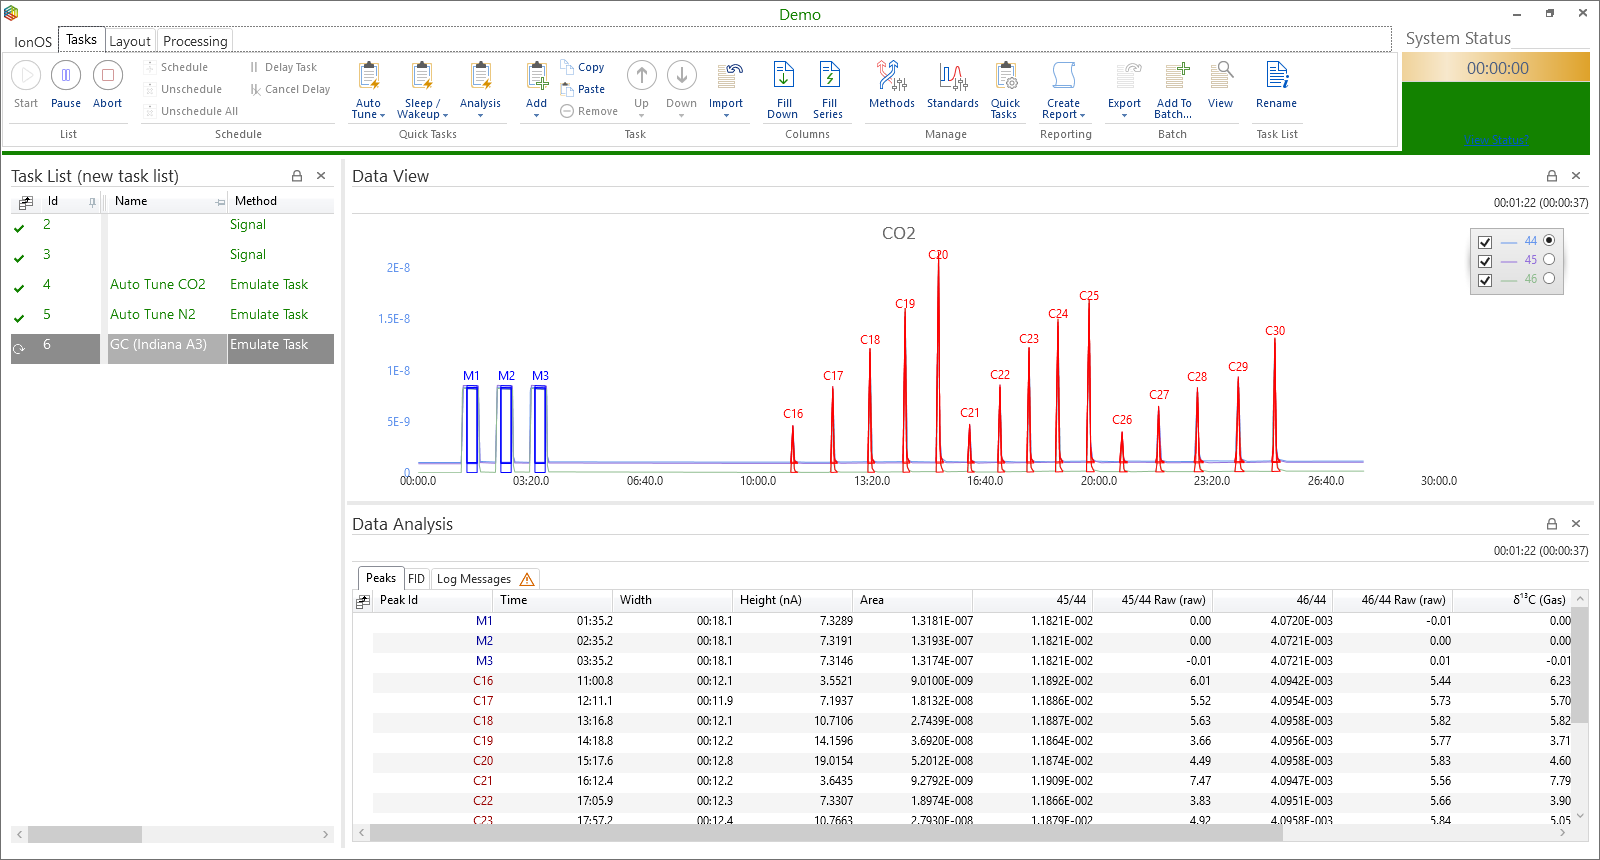
Layout of the Connected System Window
The layout of panels can be adjusted to suit the user. Use the layout Ribbon Tab to add and remove panels. You can change the size of panels by clicking and dragging on the boundary between two panels. You can move panels by clicking on their headers and dragging and dropping them in target place holders as they appear. (See Customizing Layouts).
lyticOS Menu
The lyticOS Menu within the Connected System Window provides the following options
- Save - save the current system configurations and all task information
- New Task List – create a new task list and close the current task list. This can only be done if the current task list is not running.
- Open Task List – Browse for a previous task list and close the current task list. This can only be done if the current task list is not running.
- Readbacks – Choose which device-specific readbacks you want to record during an acquisition (diagnostics)
- Open Batch – Browse for a previously create batch and open it in the separate Batch Processing Window
- Home – Show the lyticOS Home Screen
System Status Summary
How to View System Status Information
Task List
Data View
While a task / sample is running or once a task has completed, its data can be viewed in the Data View Panel by simply selecting the task in the Task List. To ensure that the Data View panel is visible, go to the Layout Ribbon Tab and ensure that the Data View option is selected.
The contents of the Data View panel will vary depending on the Task that is being run.
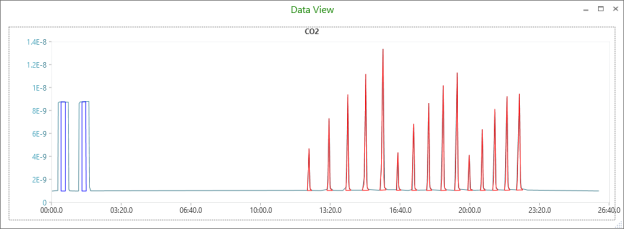
Data View panel
Analysis View
While a task / sample is running or once a task has completed, its data can be viewed in the Data Analysis Panel by simply selecting the task in the Task List. To ensure that the Data Analysis panel is visible, go to the Layout Ribbon Tab and ensure that the Data Analysis option is selected.
The contents of the Analysis View panel will vary depending on the Task that is being run (GC, EA, Auto-Tune, Peak Center, Stability, Linearity, Noise Measurement, H3 Correction, etc.)
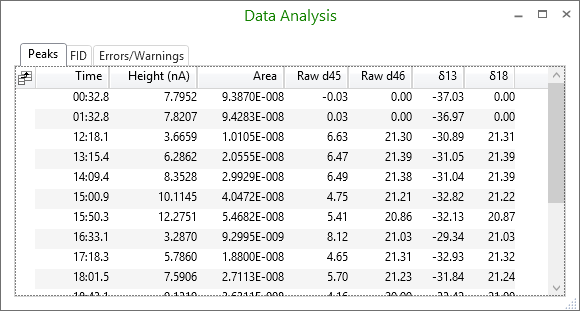
Data Analysis panel
Ribbon Tabs
Describes the different Ribbon Tabs visible within the Connected System window.
Tasks
The Tasks Ribbon Tab allows for complete control of the task list. For more information see Task List.
Layout
The Layout Ribbon Tab allows panels to be easily shown and hidden. You can also Save, Open and Manage layouts.
Processing
The Processing Ribbon Tab is a Contextual Ribbon Tab, which only appears when the currently selected task requires processing (E.g. EA or GC samples). You can edit the processing parameters from within this Ribbon Tab.
Other Ribbon Tabs
Other Ribbon Tabs appear depending on the Devices that are used within the currently connected system.
System Messages
The System Messages panel displays a rolling list of status messages associated with the system.
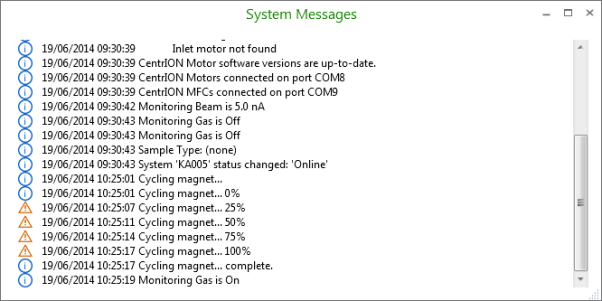
System Messages panel
Connected Device Panels
isoprime visION / precisION Mass Spectrometer
Species
The selected species can be changed from within the isoprime visION / precisION ribbon tab.
The selected species can also be changed from within the System Status Panel.
Many task methods allow the species to be specified within the Task List, which allows the system to automatically switch species from one task to the next.
Tunings
The selected tuning can be changed from within the isoprime visION / precisION ribbon tab.
The selected tuning can also be changed from within the System Status Panel.
Many task methods allow the tuning to be specified (along with the species) within the Task List, which allows the system to automatically switch species and/or tuning from one task to the next.
Beams Panel
The beams panel displays a summary of the beam values relevant to the currently selected species.
The displayed beams and their display settings can be configured for each species.
Ribbon
Add a screenshot of the Ribbon
Within the isoprime visION / precisION ribbon tab you can manage the available species and tunings, which allows you to add new tunings, change existing settings and define the default tuning for a particular species. The default tuning for a species is chosen when changing species without providing a tuning option.
Peak Jump
The peak jump operation provides a quick mechanism for changing the Acceleration Voltage to view a different mass, without changing any other tuning parameters.
Magnet Cycle
The magnet cycle button provides a quick mechanism for performing an automatic magnet cycle.Note that magnet cycling is performed automatically when switching between species or tuning which use different magnet currents.
Source
The source can be manually turned on or off. Turning the source off will turn the filament off and set the Acceleration Voltage to 0.
Control Panel
The isoprime visION / precisION Control Panel allows you to quickly check the Source, Filament, Vacuum and Magnet status.
Advanced Panels
centrION
Ribbon
The centrION ribbon tab allows you to
- Turn the monitoring gas on or off
- Set the default monitoring gas beam height
- Define dilution types (used in EA systems)
Advanced Panels
Batch Processing Window
lyticOS supports the import of third-party data and is available to anyone within the stable isotope community as a standalone data processing client.